Showing posts with label Treats. Show all posts

Monday, June 29, 2015

Vintage Americana Style Mini Treat Bag - HSS215

Pin It Now! Independence Day is right around the corner!  Here is a little vintage style bag made from the Mini Treat Bag Framelits dies.  I love vintage Americana, so I wanted to keep that flair.  My bag is holding a bunch of sparklers, with a few wrapped in (retired) SU Tinsel Trim.
Here's the inspiration collage for this week's challenge.  SO great!  
I was inspired by the woodgrain, the pennants, and the color combo of the bouquet of flowers.
I used Pacific Point, Real Red, and vanilla.  The vintage print from the Typeset DSP was perfect for the vintage feel!  
I opted to cut the stars diagonally across the bag, and lined it with the vintage print from behind.
The rosette is a 1" x 12" strip, and scored every 1/4".
The sentiment is done by me on the computer with a free font US Declaration.
The little banner punches are stamped with Hardwood.
I crumpled the vanilla seam binding ribbon and doily and rubbed them with Crumb Cake sponging.
What do you have planned for the 4th?  Whatever you do, spend a little moment to lift up our nation in prayer.  What a blessing it is to be in this great land!  Pray for her protection and preservation. Thanks! 
SUPPLIES:
STAMPS:  Hardwood
INK:  Crumb Cake
PAPER:  Pacific Point, Real Red, Red Glimmer, Typeset DSP, Whisper White
EMBELLISHMENTS:  Vintage Faceted Buttons, Very Vanilla Seam Binding Ribbon, Mini Banner Punch, Mini Treat Bag Thinlits, Star Punch (retired), Linen Thread, Doily, Score tool


Wednesday, August 13, 2014

Envelope Punch Board Favor / Treat Boxes

Pin It Now! Just a little share today - these are gift boxes I made for my recent open house, they are cute, little, but sturdy!
They easily fit several Dove chocolates inside, and decoration options are limitless!  I used retired DSP and Sycamore Street ribbon.  But now I'm thinking back-to-homeschool, Halloween, and more!
I followed instructions on this video, which made it easy to figure out and crank out 16 of them from 4 sheets of DSP!
Hope you're inspired to make some gifty things!  Have a blessed and creative day!  ~ Erika

SUPPLIES:
STAMPS: A Fitting Occasion
Envelope Punch Board, 1" Circle punch, 1-1/4" Scallop circle punch


Friday, April 18, 2014

Easter Greetings & Treat Holders!

Pin It Now! I haven't had much time to post lately, but wanted to share a few of the Easter goodies I've made for friends & family.   I've been working behind the scenes to create more often, so here's a recap of this month's projects!

Here's a funny little punch art bunny.  I love this bunny with his tail end sticking up!  
The Stampin' Up! owl dressed as a bunny!  The bunny idea was a find on Pinterest, and the banner was added for a little more celebration!  
I loved this bunny card, it's clean and simple.  Uses the fabulous Hardwood background stamp, Eggstra Spectacular Easter set from the 2014 Spring Mini, and a little layering and glittering (note the glittered bunny tail!).  I knocked out a bunch of these in no time!
The Easter cross card!  I love this retired Crosses of Hope set.  It looks SO wonderful as a cross for Easter.  Layered with Deco Label Framelits, the new Petite Petals punch (2014 Spring Mini but WILL carry over to the 2014-2015 catalog), and Bird Builder Punch for the leaves.  The sentiment is stamped on vellum & hand cut into a banner strip.
I have to make some more of these little bunny houses this weekend!  They are SO fun!  They are cased from here. Using Milk Carton Bigz XL die, Hardwood, Elegant Butterflies Sizzlits, Bird Builder, and 1-3/8" Circle Punch.  
These Tag Topper Punch treat holders have been all around the web this year.  Created with the Tag Topper Punch (spring 2014).  My boxes measure 2" x 8" - punch both ends, score the bottom, and stick a little treat to the inside.  Then decorate as you wish! 

Mine are all gone by this point, but my stampin' friend Kathy made these for a class and I'm borrowing her pic.  Thx, Kathy!
Finally, my bunny bags!  I sent these to my downline and my mom.  They loved this little handcrafted muslin sack!  The chocolate bunnies are stamped on fabric, stitched onto scraps of old sheets, and stuck on a muslin sack.
If you have any questions about any of these projects, please feel free to shoot me an email or ask in the comments section.

Have a Blessed Easter, everyone!  xoxo


Monday, September 23, 2013

Hey, Pumpkin! Halloween Treat Box HSS169

Pin It Now!
I don't send out many Halloween cards, but I LOVE candy, so most of my Halloween posts will be treats!  Here's a cute little kraft box created using Hand Stamped Sentiments' latest sketch challenge...
The sketch:
This was quick and simple to make once I rounded up all the elements.  The circle border is from Kind & Cozy.  You wouldn't have guessed it could look spooky in black Stampin' Emboss!  After gluing in Window Sheet punched from the 2-1/2" circle punch, the front was decorated with the cute hex stamp Hey, Pumpkin! from the hostess set Perfectly You.  The little bow is handmade from a scrap, and embellished with a black Glimmer Brad.  And the b-o-o?  Those letters come from Sweet Essentials, hand cut from the sentiment "Bride and Groom". I wanted them to look like vintage typewriter. 
Let's peek inside, shall we?
The eyes are krispy chocolate, yum-yumm!  Here's a pic of the (empty, haha) bag.  If you're interested in buying these, I got mine from Dollar Tree.  A whole bag can easily fit in the box, but hey! It's a dollar for a super cool treat!
If you would like to buy a kit to create this box on your own, including the candies, I can send you one for $3 plus shipping - This includes everything you see; the box, pre-stamped Halloween image, paper strips, window sheet, and candy.  You put it together.  Email me! inkypinkies@hotmail.com

Head on over to Hand Stamped Sentiments to see all of the cards and creations made with this simple sketch, and create something today!


Thursday, February 14, 2013

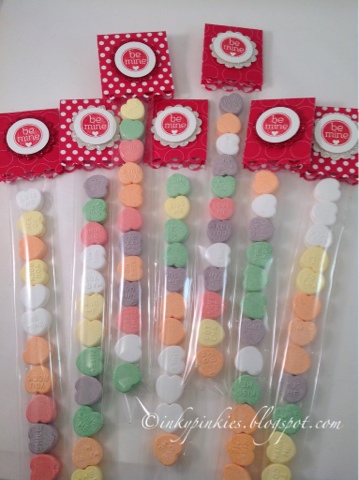
Quickie Valentine Treats

Pin It Now! Here's a super quick project to put together for a class or a group of friends. My 8 year old and I put a dozen of these together in 15 minutes before youth group tonight!

Just a little Polka Dot Parade DSP, 4" x 1-1/2", punched on the end, and a layer of scallop circle punched Glimmer Paper with a circle punched image from Mixed Medley hostess set.

Have a willing assistant stuff 12 conversation hearts in each cello bag and you're out the door, no more than 10 minutes late :) My friends know that is Right On Time for me.

Have a lovely Valentine's Day! Erika


Friday, May 4, 2012

Sweet Shoppe Duet {Cards for Kids}

Pin It Now! A little birthday happiness for anyone that likes the bright, cool colors reminiscent of the '50s soda shoppes.


The card is 3" x 6" on Pool Party textured cardstock, with Edgelits, Sweet Shoppe DSP, tab punch, and trimmed out with Real Red Glimmer Paper and Galaxy Glitter on the frosting. Stamp set is Sweet Cake from the Spring Mini. 

The Pixie Stix favor I made to be used as a gift topper, with Button Buddies cherry image, the body of the tag from 2-1/2" circle punch, and trimmed and tied with Cherry Cobbler Baker's Twine. The Pixie Stix will probably be a bigger hit than the present you tied them onto! :D


Have a blessed & creative day! Erika.

Friday, April 6, 2012

Cute Carrot Treat for the Kiddies

Pin It Now! Here's one craft I had the 2nd graders make at their Easter Party today.


Just a cute little sugar cone carrot in a pastry bag, wrapped in Pumpkin Pie DSP and tied off with dotted scallop ribbon and curls of organza ribbon.


On a few, I added a punched pennant with a Happy Easter banner from Heaven Blessed.


I also included a little printable of the jellybean Easter story, which describes the religious meanings behind all the colors of the beans.

Here's a link to a printable for the story.

Have a blessed & creative day! Erika. www.erikaclark.stampinup.net

Wednesday, December 7, 2011

SNEAK PEEKS BEGIN! ...with a Paper Players Challenge

Pin It Now! Oh, wow, my friends!  I am in possession of some gorgeous new items from Stampin' Up!'s Spring Occasion Mini.  This catalog is bright, fresh, and innovative.  Lots of brand new ideas.

I used my new stash for this pretty little treat topper.  The Paper Players #75 challenges us to use non-traditional colors for a Christmas project. So I used Blushing Bride and Wild Wasabi, with a smattering of silver glimmer.


The topper was cut from a new product called Framelits Labels, there are several of the same shapes you can cut with the Big Shot and the all nestle.  Nice!


The ribbon is new also, Pleated Satin.  It comes already pleated and stitched!  I formed it into a little Christmas tree. 

I topped my tree with another newbie, LARGE Basic Pearls!  They're big, 8mm.  More is more, right?!  It's backed with a silver glimmer punch from bitty punches, and the tree trunk is another snip of silver glimmer paper.


The banner is a stamp from Pines and Poinstettias, stamped on watercolor paper, and brushed with a little Blushing Bride with a watercolor pen.


I filled them with some yummy Mint M&Ms, tucked into a Small Cello Bag.  Don't eat them, though, I'm pretty sure there's glitter in there!  Hee hee!

Here's the Paper Players Challenge.  Why don't you give it a try??

Have a blessed & creative day! Erika. www.erikaclark.stampinup.net

Tuesday, September 13, 2011

WITCHY DIVA TREAT

Pin It Now! I'm fixin' up a batch of these sweet treats for my card club girls...


They're made using cello treat bags in the Holiday Mini, only $2.50 for a pkg of 50. You could make these all day long & never run out of clever ideas for toppers! (product #124134)


For this one, here's what I did...
Punched 2 lg scallop circles
Punched 1 XL circle punch & ran thru Big Shot with spider web embossing folder
Stamped witch image from Out On A Limb in Holiday Mini with Basic Black
Colored in with several pale Stampin' Write Markers (Wisteria Wonder, Certainly Celery, Pumpkin Pie, Rose Red for cheeks)
*Carefully* cut out her legs, & skim around them with black marker to hide the white cut marks
Using the 1-3/8" circle punch, stick the witch image into the punch, legs first, till her two hands line up with the sides at the bottom third of the punch. Make sure her legs are pulled out of the punch (your punch is upside down so you can see what you're doing) and punch her out. It'll look like she's sitting with a moon as her backdrop.


Sponge the "moon" in Daffodil Delight, edge with Champagne Mist Shimmer Paint.
Create a mist bottle of Champagne Mist using 30/70 Shimmer Paint to Alcohol. Spritz all the black pieces. The shimmer is amazing!
Piece it all together as shown, tying a bit of 1/4" taffeta ribbon under the moon, so she has something to sit on ;o)
I use Sticky Strip to adhere the scallops to the cello bag. No fumes to affect the candies!

Oh, don't forget her bling! She's a diva, after all. I used black Galaxy Glitter applied with the tiniest paintbrush & 2-way glue to the hat, dress & shoes. Then a couple of basic rhinestones.

Have a blessed & creative day! Erika. www.erikaclark.stampinup.net

Tuesday, September 6, 2011

STITCHED STOCKING TREATS

Pin It Now! I whipped up a batch of these for a swap, and to use as thank-yous. 

This is the new Stitched Stockings set and Stocking Builder Punch from Stampin' Up's Holiday Mini. 


SUPPLY LIST:
PAPER: CHERRY COBBLER, WHISPER WHITE
STAMPS: STITCHED STOCKINGS, DELICATE DOILIES
TOOLS: STOCKING BUILDER PUNCH, XL SCALLOP PUNCH, 1-3/8" CIRCLE PUNCH, 1-3/4 CIRCLE PUNCH
EMBELLIES: MICA FLAKES, CHERRY COBBLER SEAM BINDING RIBBON, BASIC RHINESTONES, STAMPIN' DIMENSIONALS, CRYSTAL EFFECTS, STICKY TAPE
 It takes EASY and CUTE to a whole new level!!!

I alternated the stocking tops using Mica Flakes and Cherry Cobbler Seam Binding Ribbon.  Which do you like best?  If you're wondering about mica flakes, I wasn't sure about them, but couldn't wait to give them a try.  I punched the stocking tops (a small rectangle), and laid them in my glitter tray.  Then I applied an even layer of Crystal Effects and poured mica flakes generously over all.  I took a large punch, turned upside down, and placed it over the pile of mica flakes, and left it there for several minutes.  This flattens the fluffy flakes so your punch will retain its shape.  Then I removed the excess flakes, applied another layer of Crystal Effects over the first layer, and repeated.  This gave me a nice, thick, but more flattened layer of mica flakes.  I trimmed the edges of them, because I love everything SYMMETRICAL! I love glitter and glitz, but I had to find a way to use these shiny pretties without looking sloppy. 

All in all, these take about 5 minutes to make, with the right supplies.  If you need any of these, head right on over to my Stampin' Up! Shop, open 24/7/365. 

Have a Blessed and creative day!  Erika

Wednesday, April 6, 2011

CUTE CHOCOLATE CRITTER!

Pin It Now!
This simple little project is ideal for papercrafters of any age. My 7 year old Ryan made one last night and was so tickled with himself! I have to admit, it tickles me too! You can't see because of the bow, but there are little white teeth cut from a scalloped circle punch! Thanks to simplysimplestampin for some cute ideas. We'll be making these as a quick project at my Stampin' Buffet this Sunday. Please go to my Stampin Up! site for more details. http://www.erikaclark.stampinup.net/