Showing posts with label Easter. Show all posts

Monday, March 23, 2015

Easter Bunny Does the Happy Dance for HSSSC208

Pin It Now! This sketch challenge at Hand Stamped Sentiments will have you pulling out embellishments and ribbons from all corners of your craft room.

Lots going on here! The oval shape is just perfect for the Happy Easter Bunny stamp, and I got another chance to use my Bow Builder Punch, embellished with a little sequin and a rhinestone.  I love coloring the bunny and the little vine around him!  For the side circles, I used vellum with a Starburst die cut in half and hole punched with a Crop-A-Dile.  I love using vellum to add layers. 
Hop on over to HSS and play along!  


SUPPLIES: 
STAMPS: Happy Easter Bunny (Spring 2015 mini)
INK:  Memento Black, Strawberry Slush, Pear Pizzazz, Bermuda Bay, Daffodil Delight
PAPER: Brights DSP stack, Strawberry Slush, Whisper White, Vellum
EMBELLISHMENTS: Bermuda Bay sequin trim, Strawberry Slush Thick Twine, Basic Rhinestones,Bow  Builder Punch


Monday, January 26, 2015

The Bunny's Happy Dance

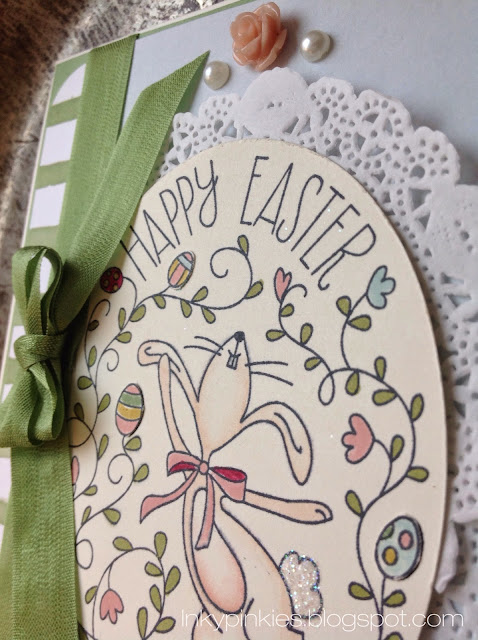
Pin It Now! Isn't this the cutest Easter bunny ever?  It rivals Stampin' Up's beloved chocolate bunny in the sweetness department.  It's nice and big, easy to color, and makes a BIG statement!

Here I've used our latest sketch from HSS to showcase my cutie.
Those embellishments on the top...amazingly beautiful!  The resin rose, pearls, and the doilies are all included in SU's latest Artisan Embellishment Kit. The bunny is colored with Blendabilities skin assortment, in Nude and Blush for the belly.  I used a variety of markers and Blendabilities for the flowers, eggs, and leaves, depending on what colors I needed.  I used only one doily - cut in half and strategically placed.  
And some glitter on his tail!  
Inside, I chose a retired sentiment, as I wanted to stamp something in there, but "Happy Easter" is already emblazoned on the front.  So since the bunny is dancing, and Easter is the most important Christian holiday, "celebrate" is totally appropriate!
Here's the sketch...what can you do with it this week?  Head on over to Hand Stamped Sentiments and have fun!  

SUPPLIES:  
STAMPS: Happy Easter Bunny, Inviting (ret)
INK:  Memento Black, Soft Sky, Blushing Bride, Rose Red, Wild Wasabi, Daffodil Delight. Blendabilities: Skin Tone Assortment, Old Olive light. 
PAPER:  Painted Blooms DSP, Wild Wasabi, Very Vanilla
EMBELLISHMENTS:  Artisan Embellishment Kit, Wild Wasabi seam binding ribbon, Dazzling Diamonds Glitter
OTHER: Creative Memories oval cutting system

Friday, April 18, 2014

Easter Greetings & Treat Holders!

Pin It Now! I haven't had much time to post lately, but wanted to share a few of the Easter goodies I've made for friends & family.   I've been working behind the scenes to create more often, so here's a recap of this month's projects!

Here's a funny little punch art bunny.  I love this bunny with his tail end sticking up!  
The Stampin' Up! owl dressed as a bunny!  The bunny idea was a find on Pinterest, and the banner was added for a little more celebration!  
I loved this bunny card, it's clean and simple.  Uses the fabulous Hardwood background stamp, Eggstra Spectacular Easter set from the 2014 Spring Mini, and a little layering and glittering (note the glittered bunny tail!).  I knocked out a bunch of these in no time!
The Easter cross card!  I love this retired Crosses of Hope set.  It looks SO wonderful as a cross for Easter.  Layered with Deco Label Framelits, the new Petite Petals punch (2014 Spring Mini but WILL carry over to the 2014-2015 catalog), and Bird Builder Punch for the leaves.  The sentiment is stamped on vellum & hand cut into a banner strip.
I have to make some more of these little bunny houses this weekend!  They are SO fun!  They are cased from here. Using Milk Carton Bigz XL die, Hardwood, Elegant Butterflies Sizzlits, Bird Builder, and 1-3/8" Circle Punch.  
These Tag Topper Punch treat holders have been all around the web this year.  Created with the Tag Topper Punch (spring 2014).  My boxes measure 2" x 8" - punch both ends, score the bottom, and stick a little treat to the inside.  Then decorate as you wish! 

Mine are all gone by this point, but my stampin' friend Kathy made these for a class and I'm borrowing her pic.  Thx, Kathy!
Finally, my bunny bags!  I sent these to my downline and my mom.  They loved this little handcrafted muslin sack!  The chocolate bunnies are stamped on fabric, stitched onto scraps of old sheets, and stuck on a muslin sack.
If you have any questions about any of these projects, please feel free to shoot me an email or ask in the comments section.

Have a Blessed Easter, everyone!  xoxo


Monday, February 24, 2014

Who Doesn't LOVE a Chocolate Bunny?! Hybrid Muslin Sack & Card ForEaster

Pin It Now! Surely I'm not the only one who adores Stampin' Up!'s retired Chocolate Bunny stamp!  Did you know it's available as a digital download?  Yes!  You can color them any color you want, including any of SU's colors that have ever existed, and print them any size, any quantity, forever!  For only $1.95.  Seriously!

Today, I want to share with you my Chocolate Bunny project!  I've put the bunny on a card, and printed her onto fabric and stitched her to a muslin bag.
The hexagon embossing folder is used, but I only cranked it about 2/3 through the Big Shot to give it a subtle fade.

The bunny is nestled inside the photo strip Framelit from On Film Framelits set.  The chevron behind her is just the reverse of the cutout from the die.  I backed the square holes with Coastal Cabana for contrast.

The Happy Easter sentiment is from Delightful Dozen, stamped onto vellum with Staz On.
See the circle garland?  I stitched it myself from Subtles DSP (pink) and stamps from the latest Paper Pumpkin kit (February 2014).  It was easier than I'd imagined!  And I'm just smitten with it, I want to make loads of garland now!  

Three different circles make up the garland: 1" circle punch, smallest Starburst Framelits, and a 1" Martha Stewart punch.  
Here's a close up of my fine (JOKING) sewing workmanship!

I used printable fabric (you can find in on Amazon), printed bunnies, cut them out, and stitched them onto a scrap of Beau Chateau fabric (this is on CLEARANCE for $1.99!!!)

Before stitching all the way, I stuffed a little cotton batting inside to give her some dimension.  The pink fabric has a zigzag stitch around the edge, but I did that before attaching it to the muslin bag...I adhered the pink panel with Sticky Strip!  Easy enough!
I thoroughly enjoyed getting crafty with this project.  So often, I get pigeonholed into using paper only, but today was all good!  
The card was inspired by our latest sketch at Hand Stamped Sentiments.  I turned the sketch clockwise 1/4 turn.  Head over to play!  I'd love to see what you are up to!
SUPPLIES:
Stamps: Chocolate Bunny (digital), Delightful Dozen
Ink: Chocolate Chip, Coastal Cabana, Jet Black Staz On, Baked Brown Sugar
Paper: Very vanilla, Subtles DSP stack, Vellum, Coastal Cabana
Embellishments: Very Vintage Deigner Button, Vanilla Seam Binding Ribbon, basic rhinestone
Big Shot:  Hexagon embossing folder, On Film Framelits, Starburst Framelits
Punches:  1" Circle, 1" Scallop Circle (Martha Stewart)

Saturday, March 30, 2013

Easter Crosses of Hope Tags & Cards

Pin It Now!

Happy Easter Saturday to you!  If you haven’t put together some little goodies to give the adult friends in your life, it’s not too late.  Here’s an easy tag to make, that also quickly transforms a card front into an elegant statement.

In assembly line fashion, prepare all of your layers.  Doily Sizzix circle (largest one), wood grain embossed Sahara Sand cardstock, Crosses of Hope stamped in So Saffron (hand cut), “Happy Easter” from Teeny Tiny Wishes, punched with the Word Window punch, then banner cut at the ends.  And then your flower layers.  Here’s a quick visual on how to recolor your Flower Lace Trim easily:

I’ve seen them sprayed with a water bottle (here on Pinterest) to achieve the color spread, but I like the way the Aqua Painter works better for a variegated look. You can really work the brush into the layers and get it as wet or dry as you want.

After assembling your tags, you can run some Linen Thread through the tops of some, or make cards from them like these two.

I have several Sympathy cards to make this week, so I thought I’d make one from this tag to get started.  If I happen to have leftover tags that didn't find a home by Easter, I’ll  probably swap out the Easter sentiment for communion, baby, or whatever I need.

My guys and I put together these bags of pretzel bunnies (again, found on Pinterest here), and we plan to go to our elderly neighbors today, and visit a couple local folks in nursing homes.

Have you been watching The Bible series on History channel?  We just caught up last night, and wow, how visually stunning it is!  To see the stories played out on the screen is amazing.  I love seeing the surprise and realization on my sons’ faces when they recognize the stories being portrayed.  I think it’ll be helpful to them to see this, they’ll remember the events even better now.

Have you seen this Easter topiary on Pinterest?  Haha!  It’s adorable.  This is the one we made here at home for our kitchen table.  The base of mine is a blue glass vintage doorknob and an inverted mini tart tin.  It gets lots of comments J  My 12 y.o. says he saw a report that Peeps never deteriorate.  Weird, but okay!  I guess I’ll pack it away for next Easter and see if the research holds up.

Well, I hope you have carved out time to do something crafty this weekend!  Link up in the comments if you’d like to share, I’d love to see what you’re up to!
SUPPLY LIST:
STAMPS: Crosses of Hope, Teeny Tiny Wishes
INK: So Saffron, Old Olive, Primrose Petals
PAPER: Tea for Two DSP, Sahara Sand, Baja Breeze, Whisper White
EMBELLISHMENTS: Lace Flower Trim, Vanilla Seam Binding Ribbon, Doily from Artisan Embellishment Kit, Delicate Doilies Sizzix die, Always Artichoke Seam Binding Ribbon, Woodgrain embossing folder, word window punch


Friday, April 6, 2012

Cute Carrot Treat for the Kiddies

Pin It Now! Here's one craft I had the 2nd graders make at their Easter Party today.


Just a cute little sugar cone carrot in a pastry bag, wrapped in Pumpkin Pie DSP and tied off with dotted scallop ribbon and curls of organza ribbon.


On a few, I added a punched pennant with a Happy Easter banner from Heaven Blessed.


I also included a little printable of the jellybean Easter story, which describes the religious meanings behind all the colors of the beans.

Here's a link to a printable for the story.

Have a blessed & creative day! Erika. www.erikaclark.stampinup.net

Sunday, April 1, 2012

Reversible Twitterpated Easter Banner HSSIC111

Pin It Now! Happy Palm Sunday!  Only one week left til Easter, can you believe it?


I've had a burlap Easter banner rolling around in my head for a few days now, and like I often do, I let it simmer until I'm ready and then go to work when I have a burst of time.  Great getting half the work done before I even sit down!

My original plan was to keep the banner Springy and generic, I couldn't decided on the word to put on the banner. Spring? Easter? ...then Rejoice? ...finally I decided to get right to the point...He Lives!  Rolling those letters out of my Big Shot actually felt therapeutic and satisfying.  Yes, that's exactly what I wanted on my wall.


The best part is that it's completely reversible!  So when Easter is over, I can enjoy it as a Springtime decoration.  Or I can hang it in a window and both sides are pretty!

It goes together in a snap, below are the basics...


The fabric side is Twitterpated Designer Fabric, die cut with Perfect Pennants.


Layer and attach with a dab of Tombo Multi.
Cut a long (about 2 yards) piece of Pretty In Pink 1-1/4" Striped Grosgrain Ribbon.  Iron in half lengthwise, except for the ends which you'll tie off in a bow.
Find the center and stick a pin in it, so you know where to start placing banner pieces.


Tuck all the banner pieces into the folded edge of ribbon.  Hold with pins, and run a straight stitch all the way down. Iron nice and flat.  These below haven't been ironed yet...


The pink rhinestones are from the Blossom Builders designer die cuts in the Spring Occasions Mini.  You NEED this just for the bling.  The blossoms are awesome too, so nothing to lose!

I attached the large bling two per pennant back-to-back.  So no matter which side you're looking at, you have bling at the bottom!


The lettered side uses the Blossom Bouquet Triple Layer Punch, and Timeless Type Alpa Jr. Sizzlits.  Embossed the pink circles with Square Lattice embossing folder. I think it resembles the burlap.

I was inspired to make this project thanks to Hand Stamped Sentiments' weekly challenge HSSIC111, anything Easter!  How easy can this be?  I know you have some awesome ideas brewing too, go play along!


I can't believe my pretty tea roses are blooming already! Cutting a few for my craft room <3.

Have a blessed & creative day! Erika.

Wednesday, March 21, 2012

Local Papercrafters Easter Card Share

Pin It Now! Hey crafty friends!  Last night was my local cardmaking friends' monthly card swap, and the theme was Easter.  Here's the batch for a little inspiration...


Steph is a brand new SU demo!  I love her bright,pretty hearts stitched.


Lattice die cut into a cross on a sidestep card, by Jamie.


Mine!


Besty's Every Bunny card.  So cute!


Judyanne is an EXCELLENT coloring artist.  This is Popcorn the Bear, and I've just discovered that they have the cutest website and a whole world and story to go along.


Judyanne made us a little extra treat with the Two Tags die. Sweet!


Rose did a lot of punching, and used Liquid Pearls in the centers.  Martha Stewart punches.


Mary Anne has been hoarding the Doodlebug Designs paper.  I have some too :) It's nice and glittery.


Rose used a lot of pretty patterns,and the Cricut to make the brown bunny scene.


These last two, are Pam and her Aunt, but now I can't remember which.  Love the ladybug trim :)


Below is a cool masculine card from a previous month, I love this set from SU.  Betsy, my upline, made this...


Have a blessed & creative day! Erika.