Saturday, March 30, 2013

Easter Crosses of Hope Tags & Cards

Pin It Now!

Happy Easter Saturday to you!  If you haven’t put together some little goodies to give the adult friends in your life, it’s not too late.  Here’s an easy tag to make, that also quickly transforms a card front into an elegant statement.

In assembly line fashion, prepare all of your layers.  Doily Sizzix circle (largest one), wood grain embossed Sahara Sand cardstock, Crosses of Hope stamped in So Saffron (hand cut), “Happy Easter” from Teeny Tiny Wishes, punched with the Word Window punch, then banner cut at the ends.  And then your flower layers.  Here’s a quick visual on how to recolor your Flower Lace Trim easily:

I’ve seen them sprayed with a water bottle (here on Pinterest) to achieve the color spread, but I like the way the Aqua Painter works better for a variegated look. You can really work the brush into the layers and get it as wet or dry as you want.

After assembling your tags, you can run some Linen Thread through the tops of some, or make cards from them like these two.

I have several Sympathy cards to make this week, so I thought I’d make one from this tag to get started.  If I happen to have leftover tags that didn't find a home by Easter, I’ll  probably swap out the Easter sentiment for communion, baby, or whatever I need.

My guys and I put together these bags of pretzel bunnies (again, found on Pinterest here), and we plan to go to our elderly neighbors today, and visit a couple local folks in nursing homes.

Have you been watching The Bible series on History channel?  We just caught up last night, and wow, how visually stunning it is!  To see the stories played out on the screen is amazing.  I love seeing the surprise and realization on my sons’ faces when they recognize the stories being portrayed.  I think it’ll be helpful to them to see this, they’ll remember the events even better now.

Have you seen this Easter topiary on Pinterest?  Haha!  It’s adorable.  This is the one we made here at home for our kitchen table.  The base of mine is a blue glass vintage doorknob and an inverted mini tart tin.  It gets lots of comments J  My 12 y.o. says he saw a report that Peeps never deteriorate.  Weird, but okay!  I guess I’ll pack it away for next Easter and see if the research holds up.

Well, I hope you have carved out time to do something crafty this weekend!  Link up in the comments if you’d like to share, I’d love to see what you’re up to!
SUPPLY LIST:
STAMPS: Crosses of Hope, Teeny Tiny Wishes
INK: So Saffron, Old Olive, Primrose Petals
PAPER: Tea for Two DSP, Sahara Sand, Baja Breeze, Whisper White
EMBELLISHMENTS: Lace Flower Trim, Vanilla Seam Binding Ribbon, Doily from Artisan Embellishment Kit, Delicate Doilies Sizzix die, Always Artichoke Seam Binding Ribbon, Woodgrain embossing folder, word window punch


Monday, March 25, 2013

Heartfelt Happy Birthday Dad - Husband - Friend

Pin It Now!
My husband has a *really big* milestone birthday this week, so I took advantage of the sketch at Hand Stamped Sentiments to make a special card for him.  My idea of masculine isn't the same as his, but he knows I take his cards back after he enjoys them for awhile ;) Like all things in marriage, we share!
Here's the sketch.  Simple, and wide open for interpretation.  I had a LOT of fun with it.
The base is Basic Black, layered with a sheet of print from Tea for Two (Spring 2013 mini), and a rosette made from the same sheet.  It measures 2 lengths of 12" x 1-3/8", scored every 1/4", and this makes is nice and full, but not too bulky.  Pool Party seam binding ribbon is wrapped once around the rosette, and an extra piece is added to make 3 banner ends on the right.  Oh, I almost forgot the burlap!  I haphazardly cut and frayed a scrap of burlap (from when it was all the rage last year...can we say Pinterest?) and layered it between the rosette & the print DSP.  I think it "manlies it up" quite well.
The fun part!  At the center is a chalkboard-style sentiment.  This comes from several different stamp sets, and you can see them all at the supply list below.  First, the "Heartfelt" stamp from Layered Labels is hand inked with a Versamark pen, leaving the center out.  Stamp & heat emboss with white embossing powder. Die cut it with the coordinating frame from Framelits Apothecary Accents.  {I rubbed it first with the Emboss Buddy, under the impression that it'd keep my messy stray white spots off.  It didn't really, but it did add a little white smeariness to add to the chalkboard effect.}  Next, whip out the Stampamajig and stamp HUSBAND, FRIEND & DAD from Family Reunion, and emboss.  I added the embellishment crown and flourish from Tiny Tags with just white craft ink.  A couple of Vintage Trinket buttons (they're hot glued to the burlap) and rhinestones (guys like shiny stuff, too.  that's why they love us)
Inside and envelope...
I think it passes for a masculine card with a vintage edge to it, yes?

So glad you stopped by!  Have a blessed and creative day.  Erika

SUPPLY LIST:
STAMPS:  Layered Labels, Family Reunion, Vintage Verses, Tiny Tags
INK:  Craft White, Black Staz-On, Soft Suede, Tea Stain Vintage Ink Spot
PAPER:  Tea for Two DSP, Basic Black, Very Vanilla
EMBELLISHMENTS:  White embossing powder, Emboss Buddy, Framelits Apothecary Accents, Rhinestones, Vintage Trinkets, Pool Party seam binding ribbon
OTHER:  Burlap


Monday, March 18, 2013

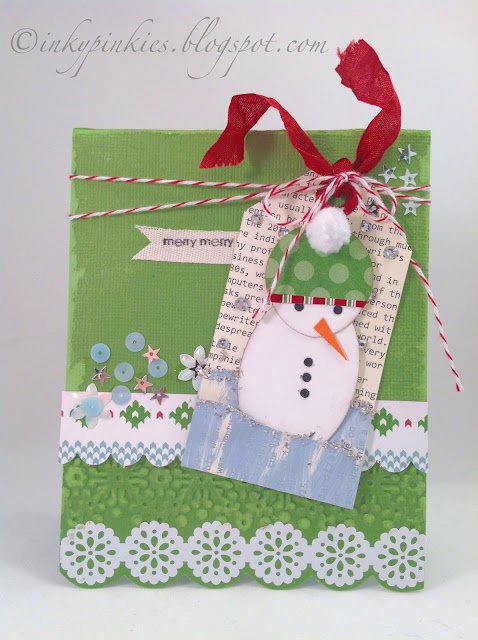
Have Yourself a Merry Little Snowman

Pin It Now! I have so, so much to do this week. A huge party to plan, tax prep, homeschool as usual, and card orders to fill. All awesome stuff, except for the taxes! But here I am on Monday, and Merry Monday's challenge stops me in my tracks again!

Snowmen are the theme, and I punched this little guy from an oval and circle punch. I love his little polka dot pom pom hat!


Gumball Green Core'dinations is the card base, scrubbied up and embossed with Delicate Details snowflake folder. Snow Festival patterned paper for the trim. I hand cut a tag from First Edition, and cut layers for snow drifts which are painted with Annie Sloan Chalk Paint (awesome stuff).


The whole card is sprinkled with bits of vintage trim...star, flower, and blue circle sequins, and glitter glass.


I was going for a nice, simple look, but just kept adding things til it felt done. Once the rhinestones went on the tag for snowflakes, I sat back and said, Yep. Done!

I used the sketch from RetroSketches for the layout, you can check them out here.
 And of course, you should join in all the Merriness at Always Playing With Paper!

Hope you're having a great week! Are you ready for Easter yet? Some Easter fun coming soon!

Erika

SUPPLIES: All supplies Stampin' Up! unless otherwise noted.
STAMPS:  Happy You
INK: Basic Black
PAPER: Snow Festival patterned paper,  First Edition, Gumball Green Core'dinations,
EMBELLISHMENTS: baker's twine, lace tape, basic rhinestones, 7/8" naturals ribbon, circle 1-3/8" punch, 2" oval punch, Cherry Cobbler seam binding ribbon
OTHER: Vintage trim, Hallmark pom pom trim, standard hole punch


Friday, March 15, 2013

Simple, Shelli, and Sketchy

Pin It Now! Today's samples are inspired by many things. 
My love of vintage.
My love of pink and green.
Christmas.  Blessings.  Butterflies. 
Sketches.  and Shelli Gardner's style. 
First, the sketch was used for both cards. 

Merry Monday #53 is a nice, clean layout. I love the rule of thirds here, and the spot for an embellishment in the corner.   I used an antiqued button from Artisan Embellishments.
 
Both of my cards were inspired by this card from Shelli Gardner's blog.  I adore her shabby chic style, and love to incorporate the look in my projects when I can.
 
To get a color matched ribbon, I sponged Very Vanilla seam binding ribbon with coordinating Certainly Celery ink.  Bits of scrap lace are layered with stamped 7/8" natural ribbon, and again, a scrap of seam binding ribbon is threaded through the button.  
 
I love that sweet "Season's Greetings" sentiment from More Merry Messages!  The embossed snowflakes are Delicate Details EF.

Second verse, same as the first...
but fresh, springy, and fluttery!
 So this one is right up my alley!  Pink Pirouette CS, Crumb Cake seam binding ribbon, a scrap of pink scalloped lace from Artisan Embellishments, safety pin from Vintage Trinkets, butterflies punched from Elegant Butterfly with Tea for Two paper, and a Vintage Faceted Button.  The embossing is done using the Delicate Designs lace folder, embossed twice, flipping the paper and lining it up so the lace matches. 
The little heart punch is taken from a vintage book of poetry, and fits just right with the card.  An extra little blessing!
 
The sentiment on this card is from Trust God.  I like that it will be good for many occasions, from new baby, congrats, wedding, even sympathy.  This one will go up for sale in my Etsy shop!  I think I'll make a few in different colors as well, I just love how easy this layout comes together! 
 
It snowed like crazy today, swirling huge flakes in the air, covering the ground in no more than half an hour! Then, this afternoon, it all melted and there were literally a hundred robins in my yard!  Yes!  Beautiful red breasted robins, picking around for treats.  Welcome, spring, even through the flakes of snow ;)
 
Hope you have a wonderful day! 
Erika

 SUPPLIES:
Green Christmas card:
STAMPS: More Merry Messages
INK: Soft Suede, Certainly Celery
PAPER: Crumb Cake, Certainly Celery, Very Vanilla
EMBELLISHMENTS: Delicate Details EF, Vanilla seam binding ribbon, wide oval lace & vintage button from Artisan Embellishment Kit, 7/8" Natural ribbon, pearls, my homemade shimmer mist

Pink Blessing Card:
STAMPS:Trust God
INK: Soft Suede
PAPER: Tes for Two DSP, Pink Pirouette, Crumb Cake, Very Vanilla
EMBELLISHMENTS: Vintage Trinkets, Vintage Faceted button, Elegant Butterfly punch, Delicate Details EF, Linen Thread, Distressing kit
OTHER:  Vintage book page, Best of Browning

Monday, March 11, 2013

Thanks with Flower Power!

Pin It Now! A color challenge always tries my patience, unless it's pink and green. So I guess it's a blessing in disguise that I should have a color challenge to participate in at least once a month!  This week (or 2) at Hand Stamped Sentiments invites us to use some juicy, bright colors...and here's my take.
Raspberry Ripple, Baja Breeze, Daffodil Delight, and a neutral of your choosing.  I used Crumb Cake, of course!

So, I punched a panel of Crumb Cake with the Blossom Punch and 1" circle punch, and stamped onto a Very Vanilla panel underneath it.  Easy enough to do, you just lay the punched panel over the vanilla, lightly trace your shape with a pencil, and use the Stampamajig to stamp the flowers.  Then pop up with dimensionals to give it a neat shadowbox look!  (I have to admit I threw the first panel away because I couldn't get the stamp lined up in the right direction.  Oops!)
The thank-you sentiment (Petite Pairs) is stamped on a small strip from Tea for Two (Spring Mini) and tucked into the top flower.  I punched it at the end with the Bitty Punch flower and placed the coordinating Bitty Button onto with a dab of Crystal Effects.  I like that it mimics the larger punches.  A few rhinestones and a border of piercing, and it's all ready to go!
Will you take the challenge at Hand Stamped Sentiments this week?  Show me what you do with these springtime colors!  Click below to visit us!
SUPPLY LIST:
STAMPS:  Mixed Bunch, Petite Pairs
INK:  Raspberry Ripple, Daffodil Delight, Baja Breeze, Black Staz On
PAPER: Crumb Cake, Whisper White, Tea For Two, Print Poetry Designer Stack (Spring mini 2013)
EMBELLISHMENTS:  Rhinestones, White Baker's Twine, Bitty Buttons, Piercing Pack,
PUNCHES: Blossom Punch, 1" circle