Showing posts with label Scrapbooking. Show all posts

Friday, November 22, 2013

My November Paper Pumpkin...Love at first sight!

Pin It Now! Like many avid Stampin' Up! papercrafters, I have been so curious about My Paper Pumpkin.  But as of a couple of months ago, I hadn't given in to the urge.  This is my third month getting the orange box in the mail, and OH, I am SO glad I got my little box on Wednesday!  Take a look at all the goodies I have made with this month's kit.  And I still have supplies leftover!
So, the kit is designed to make four cards just like this one...
But I started playing with the supplies, and decided I would see what I could get if I took it up a notch...
HOW ADORABLE IS THIS STAR GARLAND???
I TRIED TO FIGURE OUT HOW I CAN MAKE SOME MYSELF.
FORGEDDABOUTIT.  I WOULD SURELY SEW MY FINGERNAIL TO A STAR.
And then, how about a little gift box?  This will make an adorable presentation for a very special friend!  
I learned how to make this box from Connie Collins' post here.  I adjusted the measurements to use a standard card front of 4-1/4" x 5-1/2", scoring at 1"on each side.  Punching at the 1" mark at each corner. Then just embellish to your heart's content!  
Finally, I used the other half of the card I cut for the box lid to make this scrapbook layout of me and my sweet boys.  Gingerbread houses are a tradition in the Clark home!  I kept it pretty simple, just a few layers and that AMAZING STAR GARLAND!

The star cutout on the striped card base is from the Circle Thinlits Die, it's one of the extras included with the flip it card die.  The strip across the "Noel" banner is cut from the long end of the striped panel.  
One of those cute paper clip embellishments adorns the corner of the photo.  Not many extras, almost all of the embellishments are included in the Paper Pumpkin Kit!  
Do I have you enticed to try this kit?  As you can see, you can take the kit very literally and simply, getting four cards completed in 30 minutes.  Or you can let your creativity soar, and play for hours.  

Here's a peek at what it's like to get your kit in the mail!

Upon opening the box, you find a sweet Pumpkin tag and careful wrapping.
Next layer holds your monthy stamp spot, cling mount stamps, and a bit of that star garland!
The next layer reveals your paper supplies with the full color sample sheet.
Here are all of the supplies, opened up and waiting for me :)  I set it all out on the dining room table while I prepared dinner, as incentive to get it all done and escape to the craft room!
By the way, I have a lot of star garland leftover.  It was a very generous amount!  And the stamps sets, of course, will last forever.  

Are you ready for your escape in the mail?  Contact me if you'd like to sign up.  $20 a month gets you the kit, including shipping, to your door.  inkypinkies@hotmail.com

Have a blessed and creative day!  ~Erika


Saturday, May 4, 2013

Happy National Scrapbook Day! {Glassine Sack Tag Album, 50th Birthday Party Decor}

Pin It Now!

Hi friends, and Happy (inter)National Scrapbook Day to you!  Today I'm sharing with you a good reason to scrapbook - to honor someone you love.  I put together this mini album for my husband's recent HUGE milestone birthday!  It was really easy and the result was worth a million bucks.

 Simply gather a bunch of glassine bags or whatever bags you have on hand.  Need some?  Check here in my Etsy shop.
Staple them together at the bottom.
Wrap the stapled end with a piece of cardstock.  Mine is Marina Mist, embossed, and embellished with an Antique Brad & circle punch of Champagne Glimmer paper.
Wrap each bag with coordinating pattern papers.  Mine is Nautical Expedition (retired SU).  This gives the album a little body and color.
Add a little stamped embellishment to the front.  I used The Open Sea.
Now your base is done, time to fill it with memories!
I used the Two Tags die, measured the usable space, and typed up the replies on the computer. Then I cut them out and die cut each with the Big Shot.
Since it was my hubby's big giant birthday (I happen to be a LOT younger than him LOL, but I'm catching up fast), I wanted to fill it with messages of appreciation from people all throughout his life.  FACEBOOK, here I came!  I sent a group message to everyone that I thought has been touched in some way by his being around.  Childhood best friend, coworkers from 25 years ago, family, neighbors, church friends.  It was really easy once I got started.  Then the messages started rolling in, by Facebook message, text, and phone.  And it was WONDERFUL!   I was so blessed by the memories I received on his behalf.  It was very sweet to read what others had to share, and I was surprised by the heartfelt responses, especially from the guys in our lives.  But the real impact was when he read the messages.  I gave him the book the night before his birthday, and he took it to bed to read.  He laughed.  He got quiet.  And he smiled.

And this is why you have to scrapbook.

I also threw him a surprise party, and I wanted to share some of the decorations with you.  I scoured the web and Pinterest when planning his party and ended up coming up with all the ideas on my own.  First up was the banner for the cake table...
It's made of hand cut banner pieces, and LOTS of squares of Silver Glimmer Paper.  I scanned snapshots of many of the big moments in his life - childhood, grandparents, high school, our wedding, our first son, second son, and our business grand opening were some of the big ones.

Here's the hall, all gussied up!  I didn't want to do all black, I'm just very much not into the over the hill stuff :)
C. is a collector of antique clocks, so I started swiping clocks from the house earlier in the week. I set one as a centerpiece on each table, added confetti & balloons, and glue dotted a "time" quote to the face of each clock.  Lines like, "time flies when you're having fun",  "everything is better with time", etc.  It was so very HIM, and he loved it too.

  
Finally, some quickie decorations for the food table.  Jars of candy with coffee stirrers embellished with banners, pinwheels, and big fat rhinestones.  
I hope you enjoyed my birthday ideas, and hopefully you'll be able to bless somebody's life with a scrapbook, or honor them in some way with your crafty skills.  I'm going to try to pop back in later with a layout for NSD :)  Till then, have a blessed and creative day!  ~ Erika

Sunday, April 21, 2013

Happy in '72 Layout {Mother's Day}

Pin It Now!
I'm sharing a layout today of a photo that was saved from the trash bin. This was one of those instamatic '70s shots that are hard, like shiny posterboard. It was somehow split in half, and then tucked in a box for 30-some years! I found it and scanned it and it's been sitting in my folder for two years now. 

With Mother's Day coming up, it was serendipitous that it reappeared. This is me and my mother. I love the glow of her skin, and the way she's looking at me. Many of the pictures of when I was young are like this. It occurred to me that it is such a blessing to even have a photo taken of you, and then to capture a moment that shows love! Priceless. I am loved.
I'm playing along with the Jenni BowlinCentipede Challenge again, and this time I'm covering more than one challenge.
  • I scraplifted a Design Team member's layout. I was inspired by Amanda's layout, shown here.
  • Using text on a page. The “happy” heart was punched from a vintage Little Golden Book.

Paper punches from an old baby book from Goodwill. 


Here are some details on creating my layout:
  • Since the picture was practically split in half, I printed a scanned copy and tied the blue ribbon vertically down the split.
  • Two little vintage buttons and the clock charm (Stampin' Up) represent me, my mother, and the passing of time.
  • The edges and music lines are stamped with my Annie Sloan Old White Chalk Paint. Many people are using Gesso in crafting now, and I use this as a substitute. I can stencil, paint, colorwash, and stamp with it, and the drying time is almost nothing!

Do you have a photo to scrap that keeps calling your name? Go! Do it! I've waited so long to start scrapbooking again, and I can tell you, any time and any photo is perfect to get started with.


I'm also participating in a blogging event at Notes on Paper by Julie Kirk. I want to share the foremost good thing that blogging has done for me. I've been blogging now for going on three years, and here's my favorite thing about it...

Validation. The fact that I'm not alone, and someone, somewhere poked her head into my craft room and said, “ I like what you've done here, and I understand you.” Moving 500 miles away from all the crafty people I know last year, this is a tremendous blessing, my online bloggers. So many days, I'll finish a post, and a friendly comment will make my phone chime, and from wherever in the world, I got a high five! So thank you, to every one who takes the time to visit, for being a support to those you like, and not just me. You are a blessing.

Have a great week, my friend!

SUPPLY LIST:
Sahara Sand cardstock base, clock charm, and Pool Party seam binding ribbon, doily, vintage trinket safety pin, linen thread: Stampin' Up!
Jenni Bowlin April minibook kit: tag, patterned paper, ribbons, die cut tags, music stamp.
My stash: vintage buttons, heart from vintage paper. You can buy some here in my shop.

Monday, August 13, 2012

Vintage Christmas Ornament Mini Album HSS131

Pin It Now! Ahh, finally I'm home and have full access to stampin' supplies!  I have a box load of new goodies from the Holiday Catalog, and had time to just tinker around - my favorite way to unwind :)

The challenge theme at Hand Stamped Sentiments this week is Vintage. So I created a mini album Christmas ornament from an empty Dahlias container; it's a bit slimmer than the normal embellishment containers.
You can see here the plastic container that holds the pages.  The tulle flower was CASEd from pg 13 of the July Stampin' Success magazine.  I have a friend that wants to make these, so I set out to figure out the DIY.
The tulle flower is layered on loops of Very Vanilla Seam Binding Ribbon, and then on layers of Fancy Flower punches from the new Candlelight Christmas DSP.
Inside the case is a very tiny mini album of our memorable moments from last Christmas.  They are 2-1/2" punched circles of 4 different patterns, including the flocked window sheet (luscious!).  They're adhered with Sticky Strip to make a micro accordion album. 
The album cover is a pic from one of our many trips to Panera...I'm sure this was a Peppermint Mocha or something equally delish.  Anyway, I converted all of the photos to black & white so they didn't compete with the DSP, and sized them to punch with the 1-3/8" circle punch.  I made tiny ornament hangers by punching the new Champagne Glimmer Paper with the Scallop Ribbon Punch and cutting one scallop for each ornament top.  The cover is rimmed with Champagne Glitter Glass (love that stuff - very vintage!). BTW, I realized after the fact that the album should be dated "2011". Ah, well.  Fifty years from now who will know?!
 Here are the pages.  I kept the journal strips to one or two words each, but I know the inside story to each one.
 The hanger loop is the 7/8" cotton ribbon, stamped with the Good Cheer wheel stamp.  (Wheel stamps are my all time fave :)
 There are a few leaves punched with the Bird Builder Punch from Champagne Glimmer paper.
 The backside, covered with more DSP.
Vintage Christmas is my favorite Christmas style.  What does Vintage mean to you?  Join us at HSS and go all out this week with the vintage / retro / shabby chic, whatever you envision!

Monday, June 11, 2012

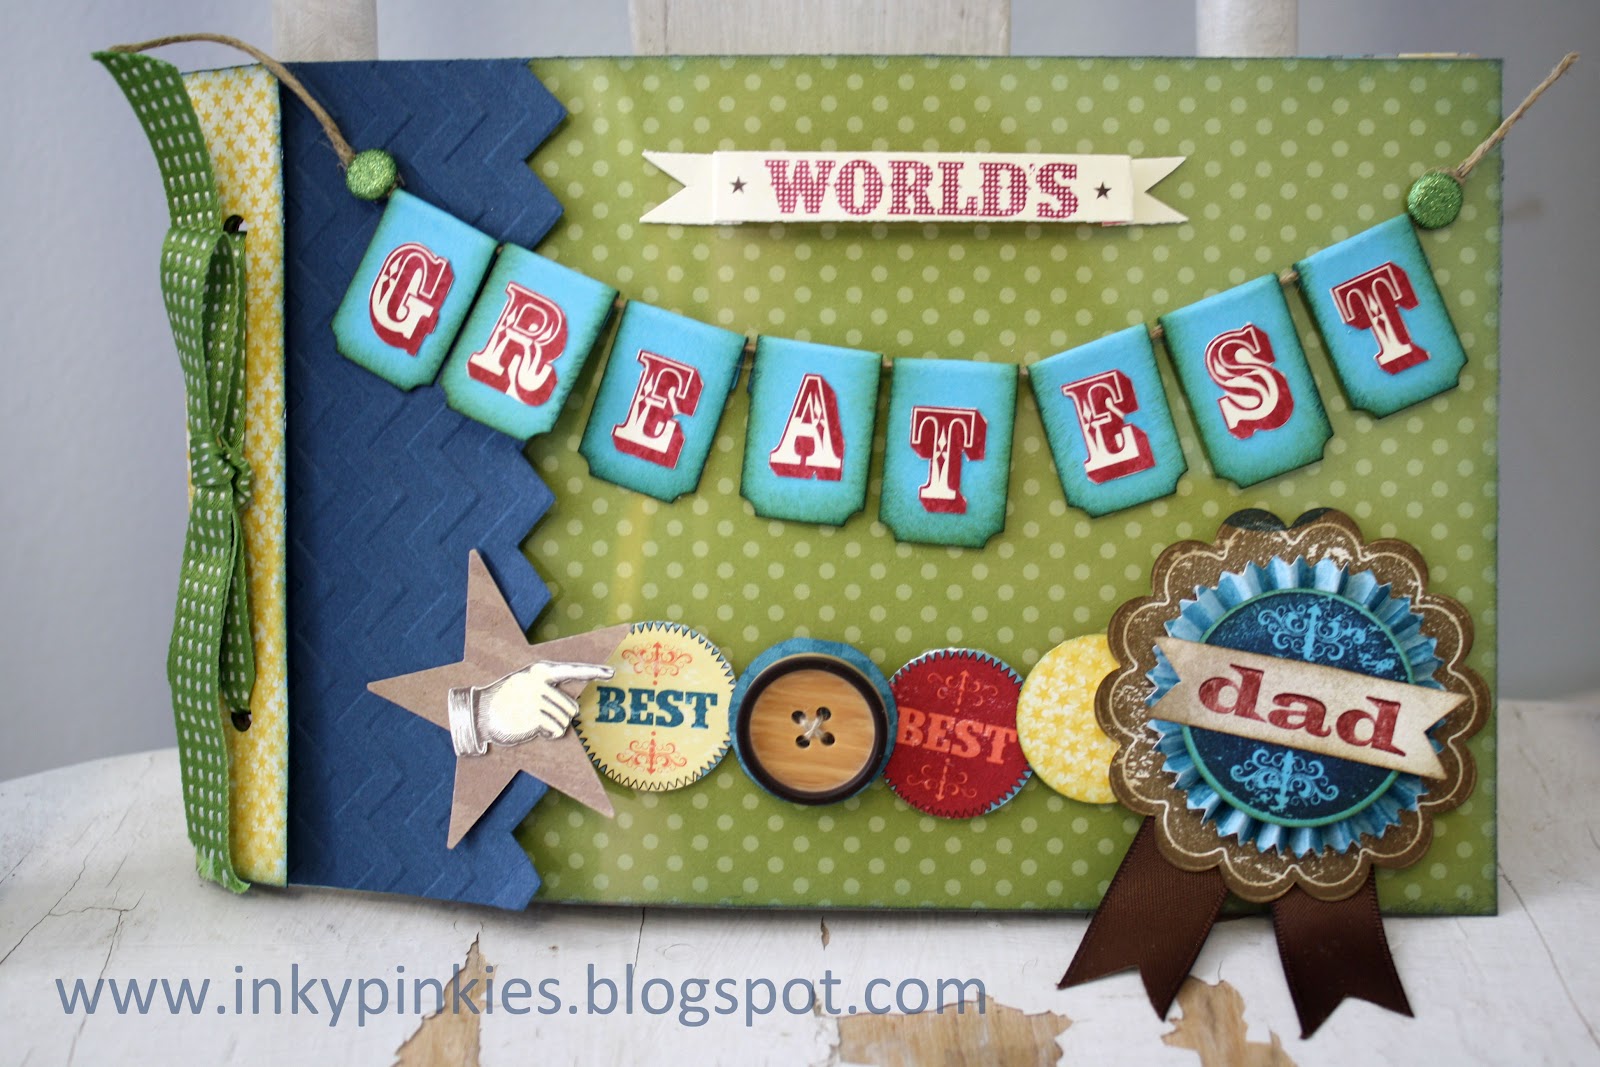
Wonderful Dad Minibook {HSS122}

Pin It Now! This week's challenge at Hand Stamped Sentiments is an inspiration photo.  Peacocks, and beautiful colors. I took the challenge figuratively and literally...I'm "Proud as a Peacock" to have a wonderful dad for my sons, and the colors work great for a masculine project!
What do you think? The colors are fabulous!  I even like the dotted background. This was an easy challenge for me, and I hope you'll join in, too.  
 Here are a couple of details...
 The cover is window sheet, inside are alternating World Spectacular DSP, Patterned Paper Pack, and Crumb Cake.
 The Crumb Cake pages are stamped with images from You're Amazing in Versamark.
The cover has all kinds of fun bits!
The banner is punched with the new Ticket Duo Builder from Tempting Turquoise, and sponged with Old Olive and Midnight Muse. The letters on the banner are hand cut from World Spectacular DSP.
All of the circle punches and words are from World Spectacular DSP.
The star is punched with Natural Composition Specialty DSP.
Stamp sets are Blue Ribbon and You're Amazing. "Dad" is from Family Reunion.
Midnight Muse border is embossed with new Chevron Embossing Folder.

I'm going to fill it with thank you notes, pictures of my boys and dad doing things together, photos of vacations his hard work has provided and some of his favorite things.

Thanks for visiting today!  Have a blessed day.  Erika

Tuesday, May 22, 2012

UStamp with Dawn and Friends!! 3rd Anniversary Celebration Edition 2012 World Showcase Blog Hop

Pin It Now!
Welcome to the UStamp with Dawn and Friends!! 3rd Anniversary Celebration Edition 2012 World Showcase Blog Hop.
 

This is the first stop of many on the blog hop.  If you started at another spot, you might be joining me from Ashley VanCamp's blog, showcasing her fabulous double layout, Beauty With Blossoms!~  Wow!  If that layout doesn't brighten a cloudy day, then her sweeties on the layout surely do!
 

If you are just joining the Blog Hop, no problem, as you can start at any point. All the Designer's Blogs are linked together so you will be able to see ALL the FANTASTIC projects we have for you.
 

Smash Books are all the rage now and since it is National Scrapbooking Month, I couldn't resist creating a do-it-from-your-own stash version of this popular memory book.

Every element of this book can come from supplies you already have on hand!  From the cover, to the pages, embellishments, and pockets, if you make cards or layouts, you can make this from your stash!
Create base pages, then "smash" in all your pictures, journaling, and ephemera. 
 Here's a peek at a few inside pages...
 Handmade tags will stretch your stampin' skills.
 Leftover strips of DSP make cute banner pages, die cuts add interesting shape to your journal.
 Create easy pocket pages to store memorabilia.  Get your scrappin' done now, and cruise through memory keeping this summer!


As a Special Thank You for stopping by my blog I am giving away BLOG CANDY!!

Please leave a comment about my project to be entered for a chance to win a dy-no-mite prize of 12 inches of ALL the BRAND NEW Stampin' Up! RIBBONS!! These NEW Ribbons will be available as part of the NEW Stampin' Up! 2012-2013 Catalog!! I will randomly select a winner to be announced on Tuesday, May 29th so please check back to see if you are the lucky recipient!
 

AND there's MORE...LOTS MORE!!


  • You have the opportunity to get the downloadable PDF Tutorial for my project FREE!! It's a GIFT from UStamp with Dawn and Friends!! Woohoo!!
  • Click below to access the FREE BLOG to get your FREE PDF Download.
The FAB Projects, FUN and Friendship continues
AFTER the Blog Hop ends!!

SAVE $$$ and JOIN US NOW for
the Early Bird Pricing for "KEEP CALM AND USTAMP ON"!! Inspired by the upcoming
2012 Summer Olympic Games in London,
the BEST of the BEST Designers
are coming together to showcase their
Gold Medal worthy talents for YOU!!
Here is what you can expect....
40+ WORLD CLASS PROJECTS
created with
BRAND SPANKY NEW
Stampin' Up! Products from the 2012-2013 catalog will
WOW, INSPIRE and EXCITE YOU!!
20 days of creative fun for EVERYONE!!
NEW Project posted every 12 hours!!
TONS of Bonus Projects!!
FREE PDFS for every project, LIVE Designer Hosted Chats, Prizes, Member Photo Gallery and so much MORE!!
UStamp with Dawn and Friends!! is
THE BEST VALUE on the planet!!
Early Bird Pricing of ONLY $19.99 ends Friday June 1st
First Project Posted on Opening Day: Jun 22nd
Last Project Posted: July 11th
Click the blinkie below to $AVE and SIGN UP TODAY!!
Ready to get hopping again??!!
Of course YOU are!!
Click below to check out what 
FABULOUSNESS
Jamie Adcock has waiting for YOU on her blog to share!!

If you would like to hop back to Ashley VanCamp's Blog, please click below:

Thanks again for the opportunity to share
my creativity with you!!


Tuesday, April 24, 2012

Spring Chevron Layout HSS115 {how to make Chevron}

Pin It Now!
This week at Hand Stamped Sentiments, it's all about SPRING!  Anything goes, with all the wonders of Spring as your springboard.  

When I think Spring, I think Love...and when I think Love, I think hubby...and Chevron....do you see where I'm going with this?!
This 12 x 12 layout features a handmade and zigzag stitched chevron background made from Attic Boutique DSP, and is embellished with Attic Boutique Side Notes.

Here's the Hand Stamped Sentiments #115 challenge inspiration...please play along!  Who couldn't use a little Spring in their day this week?

 Here are some of the details and tips....
 The little rosette was made with a scrap of White Waffle Paper spritzed with Blushing Bride Smooch Spritz that was laying on my desk.  Add a little second rosette of Pool Party Seam Binding Ribbon and an Antique Brad.  Then a bunch of ribbon strips at the bottom to finish it off.
 The Chevron background is wrapped three times in Linen Thread, then I added a bow under my bouquet and a Trinket Heart lock to give it a 3D effect.

I matted the photo on Pool Party DSP and then onto ivory muslin, and frayed the edges.
 Want to make some Chevron??  Here are the basics!

Cut a bunch of strips like so, in different but complementary patterns.


Hold 2 pieces together at a 90 degree angle corner to corner, and snip them on the diagonal.  This will ensure a clean cut look, instead of simply overlapping them, but either is o.k.  Lay them out in rows on a scrap piece of cardstock.


When you like the way it looks, adhere them down. Cut your cardstock backing to size, and you will only see the chevron strips at this point.

Stitch them together, if desired.  I used a zigzag stitch, I like the quilted look it gives.


I created a spattered look by pouring some Frost White Shimmer Paint on a stiff paintbrush and flicking it onto my cardstock.  I have to mess it up just a little!


SUPPLY LIST:
STAMPS:  None
INK: Soft suede, Pool Party
DSP: Attic Boutique
CARDSTOCK: Sahara Sand
ACCESSORIES: Attic Boutique Side Notes, Basic Pearls, Waffle paper, Blushing Bride Smooch Spritz, Frost White Shimmer Paint, Pool Party and Very Vanilla Seam Binding Ribbon, Crochet trim, Antique Brad, Heart Trinket, Linen Thread, Muslin (from craft store)

Have a blessed & creative day! Erika. www.erikaclark.stampinup.net