Wednesday, February 29, 2012

Butterflies & Blossoms Layout & Trinket Box

Pin It Now!

I am so honored to be designing projects for Ustamp With Dawn and Friends, and today my latest project premiered on her site!


It's a 6" x 6" layout with easel back, matching card and "trinket" box.  I designed it with a specific use in mind - to document the memory of a loved one or a cherished time, and tuck mementos in the box. 

I want to share with you how I finished my project. 

My sweet Gram passed away in May of last year.  She was an everyday part of my life for so many years, but particularly the last five, when she suffered from Alzheimers Disease and slowly came to need everyday care.  Dealing with a loved one with memory loss is very difficult, but as in all things, there are blessings that come from these times.  She loved my children fiercely, always wore a smile, and was my constant cheerleader.  So, I finished this little layout and box to capture the good times and hold a few keepsakes of the times I'm grateful for.
Here's us...


Here is the finished trinket box...there's a locket with curls from MY first haircut that she always kept :), and some little things she kept beside her.


I made little picture cards with journaling blocks on the back.  They're 2-1/4" x 3-1/4" on Poppy Parade, with 2"x2" squares of Very Vanilla, stamped with the lined journaler and date stamp from Notes & Details.  Die cut butterflies from Beautiful Wings Embosslits are the only embellishment.  Keep it simple, and repetition works!


Thanks so much for looking!  You really should check out all of the wonderful projects Ustamp With Dawn has to offer.  It's $24.99 for three months of access to 40+projects, chats, and community events.  Here's the link: http://bigshotroundupuswdaf2012.ning.com/main/authorization/signIn?target=http%3A%2F%2Fbigshotroundupuswdaf2012.ning.com%2F


Have a blessed & creative day! Erika. www.erikaclark.stampinup.net

Saturday, February 25, 2012

Elegant Bird and Blossom

Pin It Now! I really should be doing other things today! But when there's a card challenge rolling around in your head, new supplies, and housework to be done, what are you going to do?  All I can say is, thank God for the washing machine.  I still look somewhat productive, having the mountain of clothes attacked, and still have time to fit in this card...
I love the new Elegant Bird Die.  I plan to make some fabric projects with it very soon!  Today, she was cut with Crumb Cake and embossed with Vintage Wallpaper, inked with White Craft. Her wings are actually from the Two Step Bird Punch, not the die cut that exactly matches.  However, I thought it played well with the blossom as both leaves and wings. 

I stamped up the Crumb Cake base and the inside of the card with images from Sale-A-Bration,  Fresh Vintage.  Just enough to shabby it up a little!


The center square and bird are spritzed with Vanilla Shimmer Smooch Spritz, I took a pic in the sunlight to catch the sparkle...

 You can see how I make flower rosettes on this earlier blog post.  I used white waffle paper (from the 2012 Spring Mini) for this rosette, and spritzed it with Blushing Bride Smooch to give it a little shine and color (also from the mini).  Fabulous stuff!  I love when you can make something truly unique from Stampin' Up!'s basics. 
 Here's the sketch  posted today on Stamping 411 with The Operators.  So many possibilities here with that lovely circle in the middle.  I really love what the designers have done, you have to check it out. All sorts of creations in the center...medallions, squares in the round, doilies, a maze, and die cuts.  Fantastic!
 SUPPLY LIST:
PAPER:   Crumb Cake, Very Vanilla
STAMPS:  Fresh Vintage, Kindness Matters
INK: Crumb Cake, Soft Suede, Blushing Bride
ACCESSORIES: Elegant Bird Bigz Die, White Waffle Paper, Vintage Wallpaper Embossing Folder, Smooch Spritz, Blushing Bride Pleated Ribbon, Victoria Lace Ribbon, Bird 2-step punch, Pink Rhinestones from Blossom Builders Designer Printed Kit.
OTHER: Sewing machine, scotch tape

Thursday, February 23, 2012

Color Block Challenge

Pin It Now! After a nice, uplifting Ash Wednesday service, I'm already looking forward to Easter!  I do believe we're having an early Spring too, don't you think?

This week at Hand Stamped Sentiments, the challenge is Color Blocking. Well, I started thinking and several possibilities started brewing.  So I tried a bunch of them...

This one is a trio of die cut butterflies, on Attic Boutique DSP and Watercolor Paper, layered with the middle butterfly popped up.  Clean and simple, just a teeny bit of ribbon and linen thread trim and a little banner sentiment from Heaven Blessed.  The textured Sahara Sand CS gives it enough interest that it didn't really need more embellishment.


Inside is a little layering with DSP and Pool Party, with the sentiment and a bunny stamp.


The second card is masking butterflies with the same die, Beautiful Butterflies Bigz.  Die cut a piece of copy paper, scotch tape the unwanted cuts back onto the paper, leaving only the desired butterfly cut out.  Sponge them across Very Vanilla in Regal Rose, Daffodil Delight, Pool Party.  A little punch trim, layered DSP, on Soft Suede. More clean and simple!


Here they are together...


The third one I like the concept of, and I probably could do more with this.  It's simply 1-1/4" strips of CS and DSP, cut into squares and rectangles.  Arrange onto scrap paper and stamp a little scene of images from Heaven Blessed.  I like the detail on these stamps, and will watercolor them really soon.  But not today ;)

Once the images are stamped, move them onto the card base arrange, and adhere.  Add a little brad as a focal point.


The shape of the squares is carried through to the inside of the card here...


Here's the color block challenge from Hand Stamped Sentiments.  I love their samples this week.  Not sure I'm done with this challenge yet, I have a layout to work out still and this technique offers so many possibilities!


SUPPLIES:
STAMPS: Heaven Blessed (Spring Mini 2012)
DSP: Attic Boutique (Spring Mini 2012)
CARDSTOCK: Watercolor paper, Sahara Sand, Pink Pirouette, Pool Party, Soft Suede,
INK: Soft Suede
ACCESSORIES:  Big Shot, Beautiful Butterflies Bigs Die, Corner Rounder Punch, Pool Party Seam Binding Ribbon, Linen Thread, Dotted Scallop Ribbon Punch, Basic Rhinestones, Sponge

Have a blessed & creative day! Erika.

Monday, February 20, 2012

Fresh Vintage {cut & color}

Pin It Now! Today we were finally SNOWED IN!  I have so been craving a snow day.  Amidst the boys' wet clothes, mopping up bootprints, and chucking wood in the stove, I made a bright bouquet of Fresh Vintage flowers.


I love the color combo of shabby Basic Grey, Wisteria Wonder, and Poppy Parade.  A little Lucky Limeade to tie it all together. 

The scalloped circle is a die cut from Perfect Pennants, laced together with a little Lucky Limeade Organdy Ribbon from Sale-A-Bration.  A 1-3/8" circle punch of Lucky Limeade fills in the center, and hand-colored and cut bouquets from Fresh Vintage. I spritzed a little Basic Grey and Lucky Limeade here and there to ink up the Confetti White cardstock even more. 

An Antique Brad cinches the center of a seam binding ribbon bow.  My thought was that it looks like a little hand-tied bouquet, for a shabby-chic look. Shabby chic doesn't come naturally to me, but I really love the look when I see it!


I used The Friday Mashup's sketch and theme FM46 for my inspiration...
As well as Cupcake's Creations color challenge.  Excellent combo! 


Here's the view of the tree outside my window today.  I. LOVE. SNOW.


Have a blessed & creative day!
Erika

Saturday, February 18, 2012

Go Fly A Kite! {how to}

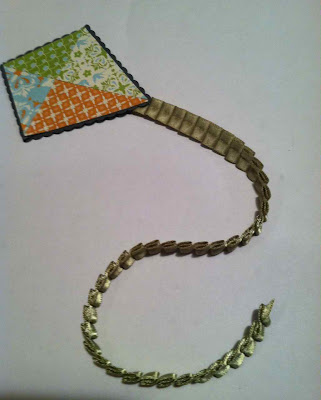
Pin It Now! This month's Stampin' Success magazine features some beautiful paper pieced kites. So pretty, I had to make one too.


Chock full of Sale-A-Bration goodies! Everyday Enchantment DSP and Ribbon & Brad pack make up the kite. New from the Spring Mini are the Edgelits Dies and Textured Impressions Embossing Folders to match.


Peeking from behind the Square Lattice is the beautiful tree image from Forever Young.


These new border treatments make a huge impact and are so easy to use!

TRY IT! Here's the basic How-To...
Start with 2 small pieces of patterned paper:
One at 1-1/4" square
One at -1-1/4" x 2"
Then cut and assemble like this:

Connect your four pieces of the kite with a 1" square of paper covered with glue or tape runner.
Use Sticky Strip around the back border to adhere the scalloped border.  Pictured here is SU's Dotted Scallop Ribbon Border Punch.
Add ribbon to kite's tail as desired. The sky's the limit!


I'm playing with a sketch from Stamping 411...


I just turned it left 90 degrees.

Have a blessed & creative day! Erika.

Thursday, February 16, 2012

Fabric Flowers, anyone?

Pin It Now! Howdy, Y'all!
I've been busy creating a few new project tutorials for the current round of UStamp With Dawn and Friends.  I want to share my latest with you...
It's a fabric wrapped wreath with four kinds of handmade fabric flowers.   Matching mini cards and box, all with beautiful Beau Chateau fabric from Stampin' Up. 


The full 6 page tutorial for this project, plus over 40 others, is available right now at the live UStamp With Dawn and Friends Big Shot Roundup, click here to join in!

Tuesday, February 14, 2012

Boy Valentine <3

Pin It Now! Here's the Valentine I made for my boys.


Lots of Love Letterpress plates
P.S. I Love You stamps
Framelits Labels largest size
Extreme Skateboard stamped inside of
SU's new Maze Game
A little Glimmer Paper and sponging.


Here is the same topper, done girly-style...


Have a blessed & creative day! Erika. www.erikaclark.stampinup.net

Sunday, February 12, 2012

Blossom Heart Valentine

Pin It Now! This is the Valentine I've made for my dear husband. I hope he doesn't think it's too frou-frou. But either way, I love it ;). And I love him.


It's Real Red CS embossed with Lots of Love Letterpress Plates and Versa-Mark. Sponged with Real Red.


Then a scrap of cardstock punched with the Full Heart Punch is covered with Sticky Strip and adhered with temp adhesive to the work surface (to hold it in place). NOW...punch 60 hearts from the Bitty Shapes Punch Pack flower punch. Yea, it took 60! Sponge all of them with Real Red & spritz them with with Blushing Bride Smooch Spritz.


Layer them onto the sticky strip covered heart, first in single layer, then build up with Stampin' Dimensionals to give it a robust look. A few of the top blossoms get pearls.

Embellish card with ribbon & a hat pin.


Here's my inside. I got a little crazy with the smooch!


Below is the card with the decorated envelope.


Here's my inspiration, it's a gorgeous card by Patricia Barber. I couldn't find a blog for her and I hope she doesn't mind the CASE! I just had to share, I think anyone would love to get a card so pretty and heartfelt.


Have a blessed & creative day! Erika. www.erikaclark.stampinup.net

Saturday, February 11, 2012

Twitterpated Fabric Flower Keychains

Pin It Now! It's snowing today, but it's all springtime in my craft room. It's full of these Twitterpated fabric blooms! Are you curious about using SU fabric but don't sew? Then grab your hot glue gun, a strip of Designer Fabric, and a scrap of ribbon and whip up one of these rosettes. I've made them into keychains. Here's how...


Tear a 3" x 24" strip of fabric and tie a knot at one end. Heat up the glue gun.


Wind and roll the fabric around the knot in the middle, adding dabs of hot glue as you go. Tuck the last bit of fabric and glue it to the back.


Using the Big Shot and Blossom Party die, cut a flower from felt, burlap, or paper. Felt works nicely.


Cut one 6" and two 3" lengths of ribbon. This is SU Dotted Scallop ribbon.


The leaves are formed from the 3" pieces like this.


The 6" strip is folded in half & hot glued, along with your two leaves Then seal it all in the back with your felt flower. Slide a keyring onto the ribbon loop and you have a sweet handmade accessory!


They fit nicely in Stampin' Up's Bitty Box.


Here's my bunch, ready to swap!


Have a blessed & creative day! Erika. www.erikaclark.stampinup.net