Monday, April 22, 2013

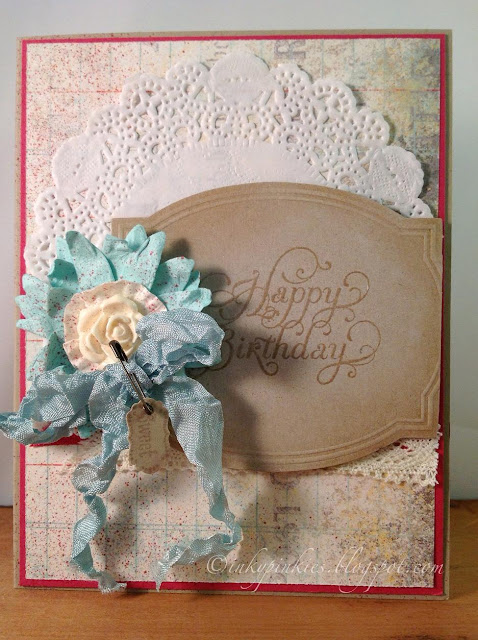
Vintage Birthday with Pop Up Posies {HSS158 Sketch}

Pin It Now! This morning the air is so crisp, and the sky is so blue, that when I stepped outside it felt like I was taking my first breath!  Amazingly beautiful April morning, even though it's only in the 40s. 

I'm enjoying a little Hand Stamped Sentiments sketch and some new-to-me stash that arrived this week.  The Pop Up Posies kit which makes layered & embellished flowers in a snap, and the This & That collection with the fabulous Epic Day papers. I divvied up some of the supplies in tins, so I can see it all. I find that I'm wayyy more likely to use my goodies liberally if I can see them in an orderly fashion. 
Here's the sketch.
And my card ~
 I used a doily for the strip across the card, and otherwise followed the sketch exactly.  As you can see from peeking into my tin, I used the Pop Up Poses kraft tag, three Pool Party flowers, and a tiny muffin liner behind the resin flower.

A few Primrose Petals details are added...a bit of ribbon, a mat of cardstock, and spritzing all over the flower and the left side of the card.   A little vintage trinket safety pin holds a tiny tag with a sweet message ;)

By the way, I turned a near mistake around when I heat embossed the "Happy Birthday" onto the kraft tag.  Glancing into my embossing bin, I saw the Sugar & Spice scented powder and it's this glorious vanilla color!  I thought, "Yes! This will be great!" Well, it embossed clear!!!  So instead of throwing it away or flipping it over, I sponged White Craft ink over and over on the embossing to produce this resist image.  I love it ~ it's delicate, and it smells SOOooooOOO good. Lastly was a little spritzing with my homemade shimmer mist, you may be able to see it on the tag.

So won't you join in the fun at HSS?  You have two weeks to play around.  I'd love to see what you do.

Have a blessed and creative day!  ~E.
Some 4 leaf clovers the boys and I found walking around in our backyard yesterday.  We should be running into all kinds of luck!


SUPPLIES:
STAMPS: Beautiful Birthday Single Stamp, Lovely Little Labels
INK: Craft White, Primrose Petals
PAPER: This & That Epic Day DSP, Primrose Petals, Crumb Cake, Very Vanilla
EMBELLISHMENTS: Pop Up Posies Designer Kit, Artisan Embellishments kit, Pool Party Seam Binding ribbon, Vintage Trinkets, Little Labels Punch Pack


Sunday, April 21, 2013

Happy in '72 Layout {Mother's Day}

Pin It Now!
I'm sharing a layout today of a photo that was saved from the trash bin. This was one of those instamatic '70s shots that are hard, like shiny posterboard. It was somehow split in half, and then tucked in a box for 30-some years! I found it and scanned it and it's been sitting in my folder for two years now. 

With Mother's Day coming up, it was serendipitous that it reappeared. This is me and my mother. I love the glow of her skin, and the way she's looking at me. Many of the pictures of when I was young are like this. It occurred to me that it is such a blessing to even have a photo taken of you, and then to capture a moment that shows love! Priceless. I am loved.
I'm playing along with the Jenni BowlinCentipede Challenge again, and this time I'm covering more than one challenge.
  • I scraplifted a Design Team member's layout. I was inspired by Amanda's layout, shown here.
  • Using text on a page. The “happy” heart was punched from a vintage Little Golden Book.

Paper punches from an old baby book from Goodwill. 


Here are some details on creating my layout:
  • Since the picture was practically split in half, I printed a scanned copy and tied the blue ribbon vertically down the split.
  • Two little vintage buttons and the clock charm (Stampin' Up) represent me, my mother, and the passing of time.
  • The edges and music lines are stamped with my Annie Sloan Old White Chalk Paint. Many people are using Gesso in crafting now, and I use this as a substitute. I can stencil, paint, colorwash, and stamp with it, and the drying time is almost nothing!

Do you have a photo to scrap that keeps calling your name? Go! Do it! I've waited so long to start scrapbooking again, and I can tell you, any time and any photo is perfect to get started with.


I'm also participating in a blogging event at Notes on Paper by Julie Kirk. I want to share the foremost good thing that blogging has done for me. I've been blogging now for going on three years, and here's my favorite thing about it...

Validation. The fact that I'm not alone, and someone, somewhere poked her head into my craft room and said, “ I like what you've done here, and I understand you.” Moving 500 miles away from all the crafty people I know last year, this is a tremendous blessing, my online bloggers. So many days, I'll finish a post, and a friendly comment will make my phone chime, and from wherever in the world, I got a high five! So thank you, to every one who takes the time to visit, for being a support to those you like, and not just me. You are a blessing.

Have a great week, my friend!

SUPPLY LIST:
Sahara Sand cardstock base, clock charm, and Pool Party seam binding ribbon, doily, vintage trinket safety pin, linen thread: Stampin' Up!
Jenni Bowlin April minibook kit: tag, patterned paper, ribbons, die cut tags, music stamp.
My stash: vintage buttons, heart from vintage paper. You can buy some here in my shop.

Saturday, April 20, 2013

Some Stamps are Keepers

Pin It Now! Today was spring cleaning in my craft room.  I decided to sort and organize every one of my stamp sets.  Look at this mess!  I should be ashamed.  I am a stamp glutton.

At least the sets on the right I've decided to sell.  But the sets on the left?  Sigh.  They're either current, or I can't bear to part with them.

In my flurry of purging, I came across the first rubber stamp I ever bought.  It's a Christmas stamp from 2006!  Before that I was purely a scrapbooker.
 Aaannnd, I found the first card I'd ever made.  With said stamp!  I joined a monthly card swap at my local scrapbook store, and started researching.  This card was a 100% CASE of a magazine card.  I shopped for every exact item on the card's supply list.  Tim Holtz Distress Embossing Powder, Tea Stain Distress Ink, actual flannel that is hand frayed!  I recall that the cards cost me over $70.00 to make 20.  Eek!  And the hours and hours of work.  I was so worried that they wouldn't be good enough. Do you know the feeling?  Performance anxiety.  Fear of putting it out there.  Looking back, and even looking back into recent history, I have felt that way many times.  This card, however, made me happy, and I'll keep it always.
I saw a card with Santa on the front by Margaret Moody that I absolutely love, and decided I will give this old stamp one more go at a CASE.  This time, it only took 15 minutes!  No shopping for supplies (just look at my craft room, haha).  And it was truly an interpretation of a card, not a copy.  It was a nice coffee break during my cleaning.
This is my second card for the Merry Monday challenge this week.  I hope that's okay, I just have a real affinity for Christmas cards!  Only one Christmas stamp set made it into the sale stack.  I think I need an intervention.
I'm so glad I'm still making cards after nine years.  I do want to get back into scrapbooking more, but cards are a wonderful way to show love and appreciation for someone.  Maybe I won't need quite so many stamps if I scrapbook more!  

 Have a blessed and creative day!  ~Erika


Friday, April 19, 2013

Starry Mason Jar Christmas Card - Merry Monday, Jenni Bowlin Centipede

Pin It Now! Even though things are blooming around here, it's a chilly, rainy day.  I made comfort food for dinner - a cornbread chicken bake (yum) - the heat is on, and I'm making another Christmas card!  I have a sketch from Merry Monday, and I'd like to show you how I stamped my mason jar onto glassine and stuffed it full of vintage stars!

Here's the card...aah, vintage. 
I've been seeing stars all over the place lately, and I happen to have a bunch of star sequins in my vintage supply tin.  I sprinkled some over the sentiment panel, and added a healthy pinch to the mason jar.


It's super easy to stuff them with whatever you want.  First, grab a glassine sack.  Need some?  Check here. Stamp your image with Staz-On and fussy cut it out, both layers at the same time.  
Use clear craft lacquer (Crystal Effects) to apply a very thin line along three sides of the back panel, but not the top.  Stick 'em together, they'll seal in just a minute.
 Use a stylus or pencil to work the top open, and add your sequins, flowers, glitter, etc.  Close the top with a glue dot.
Almost all of the elements of the card are surprisingly from Jenni Bowlin's April mini album kit, designed by May Flaum.  The patterned paper is Pink Paislee's Hope Chest collection, and I think the floral design on it is reminiscent of snowflakes.  The wooden bingo chip is heat embossed in gold to match the card.  This is the first time I've tried heat embossing wood, and it worked like a charm!  No pun intended. The ribbon and banner ends are also from the kit.
Inside, a die cut from Webster's Pages, stamped with More Merry Messages (SU). 

I made a countryfied (my word) version for a friend with a goat farm.  Here's the jar stuffed with flowers...
So check out the challenge over at Merry Monday if you're in the Christmas spirit, and see all the festive inspiration!

I'm also participating in Jenni Bowlin's Centipede Challenge!  This post goes under two challenges. "Share a Crafty Tip", and "add something shiny to your project".  You can join the JBS Mercantile Forum and join in the fun!  

Thursday, April 18, 2013

Fresh Vintage Style Cards - April Jenni Bowlin kit

Pin It Now!
Good day, friends!  I have a batch of super fresh cards from this month's Jenni Bowlin kit.  I subscribe to the mini album kits, as it has a variety of embellishments and styles from month to month.  This one was a beauty!  Lots of fresh spring blues and pinks, mixed with vintage die cut tags and luscious ribbons.  

I decided to break the kit apart, and rather than copying the kit instructions (which are awesome, btw), I thought I'd like to make a smaller tag album, and some cards.  I started by organizing my stash into a vintage muffin tin.  That way it's like an embellishment buffet, just poke around in each muffin spot and pick what you  want!  
And I can stack them when I need the space.
Need some?  I have a couple for sale in my Etsy shop :)

A lot of the paper, and the tags are set aside for the upcoming tag book.  

The first two cards share the same basic sketch, with the embellishments swapped out. This one has half of a mini doily, and the Dear Lizzy mason jar heat embossed in white on the Pretty Painterly patterned paper. It's sitting on one of the Webster's Pages tags, reversed, and stamped with my En Francais Stampin' Up! stamp in Early Espresso.  The pink ribbon and Mom stamp are also SU (1-1/4" two tone ribbon in Pink Pirouette & Family Reunion stamp). I drilled a hole through the butterfly bingo chip and added some ink and clear sealant to make it match :)  And I love the blue and white cardstock, it's SO thick and sturdy.
Second verse, same as the first!  Yellow crochet lace...is that not the best?! The little butterfly charm is tied onto the mason jar top.  
Movin' on, I used some more of that luscious lace to make a glassine bag gift card holder.  Carta Bella paper bow, and I painted another bingo chip with Annie Sloan chalk paint.  Linen thread is looped around the back and hot glued in place.  The flap still opens so you can stick a gift card inside.  Or a wad of cash ;) Broccoli, as my son calls it.
My last card was a 5" square, featuring a section of squares from the Carta Bella paper.  I stitched horizontally and vertically along the squares to make it look like real quilting, and added layers of doily, a pleated medallion, and a ribbon and lace flower in the center.  Thickers at the bottom, they're so sparkly, yet still vintage style...so so pretty!
I'm loving the kit, and am definitely getting my mileage out of it.  The tag album is coming soon :)

I'm linking up to Jenni Bowlin's Centipede Challenge - using vintage supplies for storage.

Sunday, April 14, 2013

What's On My Desk...

Pin It Now! Since the purchase of my light box many months ago, I have taken pictures of my projects carefully quarantined to the stark white-grey of the lit box.  It's been nice, mainly because I can photograph night and day, and the color is always the same.  So I haven't had to take inventory of what's left on my desk after I finish a card.  I just pile it up and start a new project.  But I always save scraps!

Kimberly Van Diepen of Stampin' By The Sea has challenged her readers to make a card with with only what's on your desk. Easy for me, as most of the stuff I love most is on my desk :) So here I go!  Come along with me. Here's my card...
And here's how I got there.  I started by shifting around things that are just stacked.  Sahara Sand woodgrain circles, a random stamp, a butterfly.  I'd like to say that I don't usually wallow in this much stuff, but I'd be lying to you.  If I'm lucky, I have a 2' x 1' area to work, and then I'm bumping piles!  I have bowls, jars, baskets, and bins. Welcome to my world!
I decided that I like these together, and now I'll pick a background.

Ooh, this is springy!  Good, I'm going with the green.

Adding a few details, I'm not sure if I'm don't embellishing, so I'm tacking it down and I'll work some more bits around.  So far, I have a banner strip from Tea for Two and a tiny scrap of Naturals ribbon.  I stamped a Mother's Day sentiment on them.  Picked up a button from what's left of my Artisan Embellishment kit.  Linen Thread, and we're almost done.

Okay!  Done!  I placed all my goodies on an Island Indigo CS base, and added a few embellishments in the corner.  The little heart on the banner is punched from a piece of vintage poetry, and I purposely chose the word "grace" to show in the heart, as a little symbol of motherly love.  As you can see, a lot of what I use is right at my fingertips.  I love it that way, I love having all my pretties scattered around me.

 So what do you have on your desk?  Link up to Kimberly's post if you get the chance, and share with me on my post too!


Monday, April 8, 2013

A Fine Feathered Thank You Note

Pin It Now! This week I'm up to my neck in a serious science fair project!  My 6th grader has decided that it's his heart's desire to participate in the homeschoolers science fair, and who can blame him?  He loves picking apart electronics gadgets and making new things like you and I like to put together card after wonderful card, so I'm all his all week! Pray I don't electrocute myself, or come out of the basement with crisped hair. I'll post pictures when we're done :) Of the project, that is, not the hair.

I bought this Fine Feathered set a while back, and it's one of those sets that I adore because it's so pretty, but don't get the chance to see it in action.  So I used our color combo with it from Hand Stamped Sentiments this week, and it did a really lovely job on the peacock feathers!  Take a look...
 The peacock feather was inked up with Stampin' Write markers in Lucky Limeade, Island Indigo, and Daffodil Delight.  After coloring in the image, I stamped it off once onto scrap paper to tone the colors down a bit, and they turned out nice and subtle.  The sentiment was added with the StampaMajig, and then random splatters with the spritzing tool.
Across the card is a strip of newsprint from Tea for Two, and a piece of 7/8" Naturals ribbon.  The bottom of the ribbon is cut with pinking shears,and the pointed edges are frayed. Finally, a triple wrap of Linen Thread, with extra knots on the side, that are frayed with my piercing tool.  I think it gives an overall natural, earthy look. 
 
I'm trying lately to not throw away my scraps, but use any leftovers for another card. All the supplies are already out, so why stop with one?  Here's my scrap darling...
Same idea, different embellishments.  Island Indigo baker's twine that I discovered after the fact, the first paper banner I cut, and the Naturals ribbon that I tried to tear but wasn't quite sure of.  A little extra spritzing. I think it'd make a nice masculine thank you note.
So, do you have anything in mind for the color challenge?  I will say that the Indigo and Limeade colors are included in the Tea for Two DSP.  But I'd love to see what you come up with.  Hop on over!
SUPPLY LIST:
STAMPS:  Fine Feathers, Perfectly Penned
INK:  Island Indigo, Lucky Limeade, Daffodil Delight, Sahara Sand
PAPER:  Tea for Two DSP, Sahara Sand, Very Vanilla
EMBELLISHMENTS: Island Indigo bakers twine, Linen Thread, Vintage Faceted buttons, Spritzing Tool, 7/8" Natural ribbon, Framelits Labels, 
OTHER:  Pinking Shears

Have a blessed & creative day!  Erika

Tuesday, April 2, 2013

Merry Monday Simple Sketch

Pin It Now! Happy Easter Monday to you! I hope your Easter festivities were bright & wonderful. It rained here for much of the day, sun popping in & out occasionally. But still a fabulous day!

I'm dropping by for a couple quick CAS Christmas cards. Merry Monday has provided an interesting sketch this week, with banner ends going up. Oh, how tempted I was to flip the sketch! But this is a challenge, no?


The first card follows the sketch to a T. The horizontal stripe is an embossed row of snowflakes, and the three banners are strips from Festival Of Prints & First Edition. I rolled the edges to reveal a little of the print on the reverse. A few punches and linen thread wrap to pull them all together.

My second card was just a result of leftover parts. The white CS that I decided to switch out, and lace tape & twine that was also sitting in my castoff bowl. I love scraps! They make my crafting spontaneous & I like this card just as much :)

Hope you have a nice week, that brings you a little sunshine & some spring flowers!

SUPPLY LIST:
Stamps: Mixed Medley Hostess, More Merry Messages
Ink: Cherry Cobbler, Old Olive
Paper: Festival of Prints(2012 Christmas Mini), Champagne Glimmer, Whisper White, Very Vanilla
Everything Else: linen thread, rhinestones, Delicate Designs embossing folder, 1-14" Scallop Circle punch, Snowflake punch (Martha Stewart), Holiday Ornaments Framelits, Lace Tape, White Bakers Twine