Pages

Tuesday, September 27, 2011

TIMELESS PORTRAIT CHRISTMAS STAR

My inspiration for this card challenge came from several paper star wreaths I've seen lately on Pinterest.  The ideas from those beautiful boards are endless!
 I loved the template, and the rich red color of the DSP. 
I made a set out of it, thought it would be nice to give as a pillow treat for my Christmas guests!
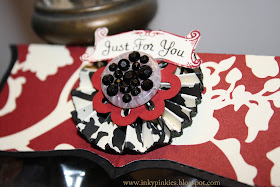
Here's a close up of the medallion.  Lots of detail in a tiny spot!  The medallion is edged in black Galaxy Glitter, and the black rhinestones are from last year's mini, but you can color the clear ones with a black sharpie and they look great. 
I love this template so much that I hope I have time to make more this week!  It's def a keeper.

If you'd like any further details, feel free to ask!

Sunday, September 25, 2011

HAND PENNED ONE SHEET WONDER

One Sheet Wonder...Using a single sheet of Spice Cake DSP.  Here's the bunch of them...

 I tried my hand for the first time with a one sheet wonder - a dozen cards made with only one sheet of patterned paper! 
Cherry Cobbler CS, Spice Cake button, medallion in Pear Pizzaz, trimmed in Galaxy Glitter, XL Scallop punch,
Felt from new 2011 Holiday Mini


Close up of the Spice Cake button made into a pumpkin.  The 1-1/4" circle punch works perfectly in there, sponged with a little Pumpkin Pie ink, added some Early Espresso to give the pumpkin some shape.  Took a scrap piece of the DSP, punched leaves with Bird Punch, another skinny scrap was wrapped around a paper clip to make the curly cue trim, and a little hand cut stem from Early Espresso. 


Happy Halloween: see above shot for detail on embellishment.

Thank you note made with Top Note Big Shot die.
"Thanks" sentiment hand colored with Stampin' Write Marker from Hand Penned Holidays.
Random stamped leaves from Gently Falling.
One strip of DSP was cut lengthwise, then each strip was scored at 1/2" and 1", then pleated.
Attached the separate pieces at opposite ends of card.
Adhere top note piece with sticky strip at top and bottom, but with 2 Stampin' Dimensionals in the center so the pleats keep their depth.

Give Thanks card, using Hand Penned Holidays and Gently Falling.
Antique Brad added to anchor folded corner.


Give Thanks
With Very Vanilla Velvet Trim, Cherry Cobbler Quilted Ribbon.
Sentiment stamped on Very Vanilla, spritzer tool, flagged ends with a square punch,
finished top & bottom with Simply Scored tool - 2 lines each across.

Merry Christmas, Clean and Simple
trimmed in Very Vanilla Velvet Trim
River Rock, Pear Pizzaz CS

Day of Gratitude stamp set.
Early Espresso Quilted Ribbon Trim,
Neutrals button, threaded with a thin strip of quilted ribbon.

With Love
Trimmed with Victoria Crochet Trim, Scallop Ribbon punch, basic pearls.
I love the way this one looks!  Pretty for anniversary, wedding, your Valentine.

Merry Christmas
Trimmed in Quilted Ribbon, basic rhinestones, ticket corner punch.
Finally, here is the template I created to cut the DSP. 
It's rough, I know!  But all the pieces are labeled with the cards I made.  I hope you can make some, too!  Please let me know if you do!


Just think, you can do a whole workshop, or 144 cards with ONE pack of DSP.  It just requires a little creativity.  Get out your stash and see what you can create! 

Till then, have a Blessed and Creative Day!!!

Erika

Thursday, September 22, 2011

OUT ON A BENCH!

This is a card I made for my local swap girls.  The theme this month was purple/orange.  We got some beautiful cards!

I used the cute trio of pumpkins from Out On A Limb, a new Halloween set.  I love its cute, cheerful take on the Halloween theme.  I set them on the bench from Have a Seat (my all time favorite set!).  Then I stamped the Halloween sentiment on whisper white and made a tiny banner out of it.

I made the pole for the banner from a quilter's pin, painted with two-way glue, and rolled right in a jar of glitter.  I was going for a look of the pumpkins holding the banner, I hope it worked out!  I also used the glitter to brighten up their stems. :) cute!!!

Here's a closer look at the pumpkins.  I just get a kick out of those moustaches!  LOVE them.

The colors used are Wisteria Wonder, Pear Pizzaz, and Pumpkin Pie.

Thursday, September 15, 2011

STITCHED STOCKINGS SWAPS

My fellow demos and I put together another awesome swap, each using a stamp set from the new Holiday Mini Catalog. I'll share all of them eventually, but here are mine...

I used Stitched Stockings and the Stocking Builder Punch.
The first one uses an image from Merry & Type, lots of embossing and bling.


Inside is a little hanging stocking.  So easy, using the Simply scored, to make a mountain fold in the middle of the card.  Credit goes to Hana Houdek for the inside layout, and for card #2.


Card #2 uses the Simply Scrappin' set from the new mini.  I LOVE the paper in it.  So bright and merry!  The jingle bells do jingle jangle jingle, incase you were wondering.  The quilted ribbon adds a nice textural detail. 


I punched a circle of the DSP from the kit, then punched a slightly larger circle thru the card front to give it some added detail. *Hint* Adhere the DSP circle after you punch the hole in the front for perfect placement.


Lots of dimension here...


Card #3 is a sweet baby card, cased from the Idea Book, but changed up quite a bit. Page 86 if you're wondering :o)


Have a blessed & creative day! Erika. www.erikaclark.stampinup.net

Tuesday, September 13, 2011

WITCHY DIVA TREAT

I'm fixin' up a batch of these sweet treats for my card club girls...


They're made using cello treat bags in the Holiday Mini, only $2.50 for a pkg of 50. You could make these all day long & never run out of clever ideas for toppers! (product #124134)


For this one, here's what I did...
Punched 2 lg scallop circles
Punched 1 XL circle punch & ran thru Big Shot with spider web embossing folder
Stamped witch image from Out On A Limb in Holiday Mini with Basic Black
Colored in with several pale Stampin' Write Markers (Wisteria Wonder, Certainly Celery, Pumpkin Pie, Rose Red for cheeks)
*Carefully* cut out her legs, & skim around them with black marker to hide the white cut marks
Using the 1-3/8" circle punch, stick the witch image into the punch, legs first, till her two hands line up with the sides at the bottom third of the punch. Make sure her legs are pulled out of the punch (your punch is upside down so you can see what you're doing) and punch her out. It'll look like she's sitting with a moon as her backdrop.


Sponge the "moon" in Daffodil Delight, edge with Champagne Mist Shimmer Paint.
Create a mist bottle of Champagne Mist using 30/70 Shimmer Paint to Alcohol. Spritz all the black pieces. The shimmer is amazing!
Piece it all together as shown, tying a bit of 1/4" taffeta ribbon under the moon, so she has something to sit on ;o)
I use Sticky Strip to adhere the scallops to the cello bag. No fumes to affect the candies!

Oh, don't forget her bling! She's a diva, after all. I used black Galaxy Glitter applied with the tiniest paintbrush & 2-way glue to the hat, dress & shoes. Then a couple of basic rhinestones.

Have a blessed & creative day! Erika. www.erikaclark.stampinup.net

Tuesday, September 6, 2011

STITCHED STOCKING TREATS

I whipped up a batch of these for a swap, and to use as thank-yous. 

This is the new Stitched Stockings set and Stocking Builder Punch from Stampin' Up's Holiday Mini. 


SUPPLY LIST:
PAPER: CHERRY COBBLER, WHISPER WHITE
STAMPS: STITCHED STOCKINGS, DELICATE DOILIES
TOOLS: STOCKING BUILDER PUNCH, XL SCALLOP PUNCH, 1-3/8" CIRCLE PUNCH, 1-3/4 CIRCLE PUNCH
EMBELLIES: MICA FLAKES, CHERRY COBBLER SEAM BINDING RIBBON, BASIC RHINESTONES, STAMPIN' DIMENSIONALS, CRYSTAL EFFECTS, STICKY TAPE
 It takes EASY and CUTE to a whole new level!!!

I alternated the stocking tops using Mica Flakes and Cherry Cobbler Seam Binding Ribbon.  Which do you like best?  If you're wondering about mica flakes, I wasn't sure about them, but couldn't wait to give them a try.  I punched the stocking tops (a small rectangle), and laid them in my glitter tray.  Then I applied an even layer of Crystal Effects and poured mica flakes generously over all.  I took a large punch, turned upside down, and placed it over the pile of mica flakes, and left it there for several minutes.  This flattens the fluffy flakes so your punch will retain its shape.  Then I removed the excess flakes, applied another layer of Crystal Effects over the first layer, and repeated.  This gave me a nice, thick, but more flattened layer of mica flakes.  I trimmed the edges of them, because I love everything SYMMETRICAL! I love glitter and glitz, but I had to find a way to use these shiny pretties without looking sloppy. 

All in all, these take about 5 minutes to make, with the right supplies.  If you need any of these, head right on over to my Stampin' Up! Shop, open 24/7/365. 

Have a Blessed and creative day!  Erika